HOW TO INJECT PEPTIDES
STEP-BY-STEP GUIDE
Follow our comprehensive guide to ensure proper injection technique. This step-by-step process will help you maximize results and minimize discomfort. Follow the instructions carefully to ensure a safe and effective experience.

First Week: Separate Injections
During your first week, inject each peptide individually. This allows your body to gradually adapt to the new compounds and helps you isolate each peptide's effects to better understand how your body responds.
Critical Safety Rule:
Always use a new sterile needle for every injection. Once a needle has entered your skin, it is no longer sterile - reusing it can introduce bacteria or trace blood into another vial, risking contamination, infection, or vial spoilage.
Example:
- •Draw Peptide A → Inject → Discard syringe
- •Draw Peptide B → Inject → Discard syringe
Second Week and Beyond: Combined Injections
Once you've established tolerance and your body has adjusted, you may combine compatible peptides into a single injection for convenience.
Use a new sterile needle to draw from each vial before injecting. You may use the same needle to pull from both vials, as long as you have not yet injected.
Example:
- •New needle → Draw Peptide A → Draw Peptide B → Inject → Discard syringe
Important: Certain compounds are designed to stand alone.
GLP peptides (Tirzepatide, Retatrutide), NAD+, and GHK-Cu should never be combined in the same syringe or vial with any other peptides.
They may be dosed within the same session, but always as separate injections - their molecular structure and stability requires this.
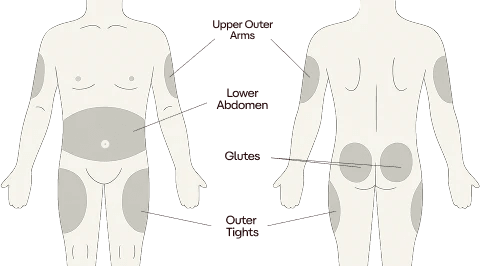
Rotate Injection Sites
Rotate injection sites and/or body regions to prevent irritation or scar tissue. For example, rotate between left/right sides of abdomen with left/right sides of upper glute.
Proper Storage
Peptides can safely stay out of the fridge for up to 7 days, but they should be refrigerated as much as possible to maintain potency.
Sterile Equipment
Never reuse needles or syringes. Always use fresh, sterile equipment for each injection to prevent contamination and infection.
Timing Consistency
Inject around the same time each day for consistency and optimal results. This helps maintain stable peptide levels in your body.
Normal Side Effects
Mild redness, itchiness, tenderness, or bruising can be normal. These typically resolve on their own within a few days.
Injection Site Bumps
Small bumps may form after injecting - this is just the fluid entering the tissue and will resolve on its own. No need for concern.
HOW TO INJECT PEPTIDES
VIDEO GUIDE
Follow along with our comprehensive video tutorial to learn the proper injection technique for peptides.